
![Tested: The Emporia Pro Level 2 EV Charger helped optimize my charge speeds at home [Video]](https://i0.wp.com/electrek.co/wp-content/uploads/sites/3/2025/06/Emporia-Charge-hero.jpg?resize=1200,628&quality=82&strip=all&ssl=1)
I recently got my hands on a Level 2 home EV charger called the Emporia Pro and have shared my thoughts below alongside a full video review. While I hit a few speed bumps in part of the installation, this Level 2 charger can essentially be a plug-and-play charger that helped me boost my home charge rates to the max.
The Emporia Pro Level 2 EV Charger is a winner
The Emporia Pro Charger is available in black or white, and you can choose between a hardwired or NEMA 14-50 Plug version. It is available on the Emporia website and was recently added to Amazon at an MSRP of $599.
Features at a glance:
- Hardwired or NEMA 14-50 Plug configuration available
- J1772 Charger Plug (Compatible with most non-Tesla EVs)
- Charging speeds up to 48 Amps
- Includes Charger wall mount with cable rack, and 25-foot charger cable
- Emporia Pro Charger comes with Vue 3 Home Energy Monitoring System included
- PowerSmart technology works with your existing electrical panel to automatically balance load and maximize charge rates
- Smarter Charging Control in the Emporia App
- Automate charging schedules, avoid peak rates, and track energy usage in real time
- Solar charging integration capabilities
- UL Listed, NEMA Rated, ENERGY STAR Certified
- 3-year warranty
Electrek’s take
Over the past few months, I’ve been testing the Emporia Pro Level 2 EV charger after successfully installing it in my garage to boost my charge rates.
This system comes in black or white and can be hardwired or simply plugged in using the NEMA 14-50 option. I chose the latter since I already had a 240V plug installed in my garage.
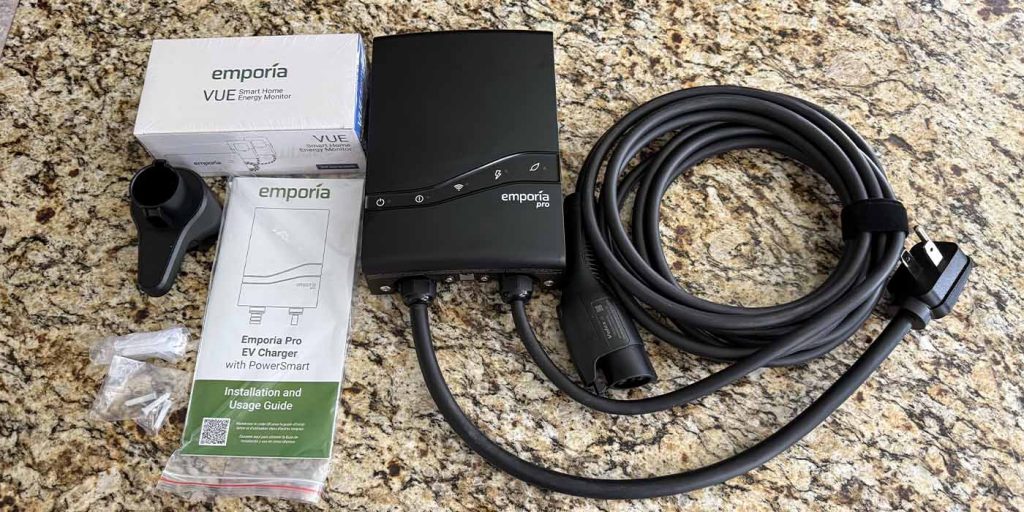
The unboxing was relatively simple and included the haul pictured above. The package included the Emporia Pro charger, a 25-foot cable, a J1772 plug, and a holster to hold the plug when it’s not on your EV.
The charger itself came with its attached wall mount bracket (see image below), which I unscrewed to pre-fit on my garage wall. I had some molding in the way, so I had to do a custom job to fill the gap.
After I measured where I wanted the Level 2 charger hung, I cut out a piece of plywood to support the bracket. After screwing the plywood directly into the wall, the Emporia charger’s bracket was able to sit flush, so I screwed it in with the included hardware, then hung the charger up before securing it with the bracket screws.
Since I had the NEMA plug, my version simply plugged in and was ready to start charging as soon as it was hung up and screwed securely.
To complete the charger setup, I also installed the included cable holster, which enables the excess cable to be strung around the plug itself. That portion merely took a few wall anchors and some screws. Easy.
Here’s the fully installed Emporia Pro charger:


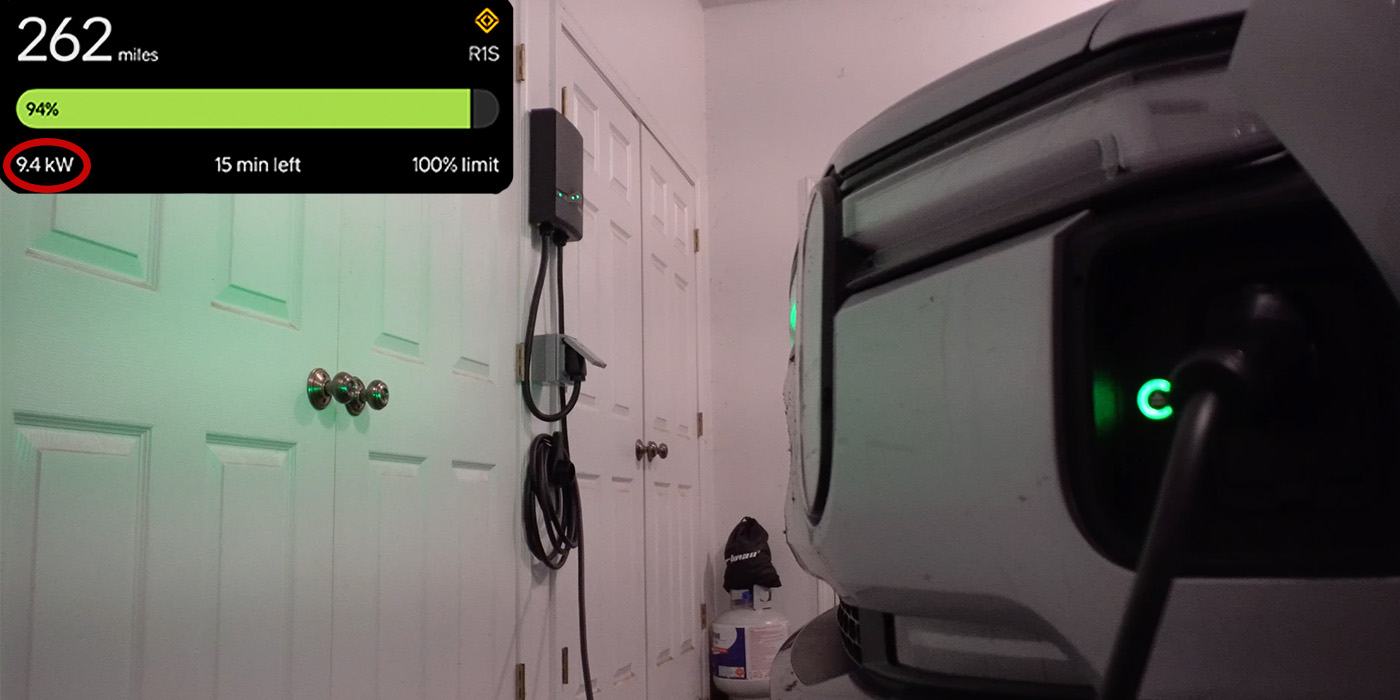
Next, it was time to plug it in and test it out on my Rivian.
Before getting the Emporia Pro, I used the modular charger cable that came with my R1S, which only got me 1.3 kW on a 120V plug and about 7.2 kW on a 240V plug. From the first charge, the Emporia Pro was significantly faster, averaging a charge of 9.4 kW using the same electrical configuration.
Another feature of the Emporia Pro charger is that it comes with the company’s Vue Home Energy Monitor System, which can track your energy consumption in real time and help reduce it. It can also be set to use certain devices when most affordable, during off-peak hours.
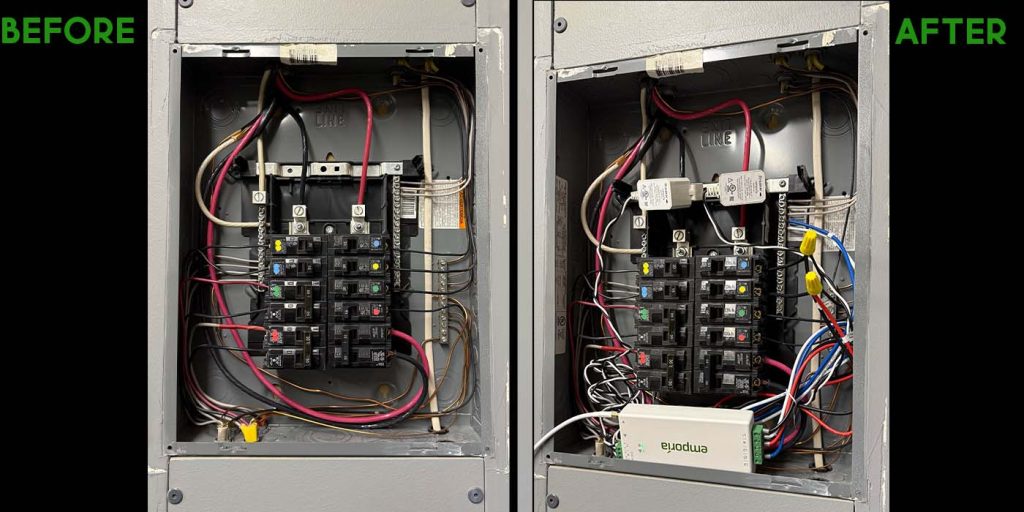
This part of the installation was more daunting for me as I’m not as confident in electrical work. In addition to several electrical components and wires (pictured below), the Vue’s installation instructions were extremely confusing. Due to its versatility and ability to implemented within a number of home wiring configuraitons, including those with solar panels, I wasn’t sure which setup was right for me, and it put a delay on my installation.
I needed help.
Luckily, I got in touch with an installation expert at Emporia (shout out to Ben!) who had me send a picture of my electrical panel and told me exactly what configuration to use and where to install each colored wire. Things were much easier from there, and I had the VUE Home Energy Monitor wired and connected to my home WiFi in no time.
Once all the wiring was connected, I could install and open the Emporia App, find my Vue device, and connect to it. As you’ll see in my video below, I could then track my home energy usage in real time. That included how much power my Rivian pulled while on the Emporia charger.

Overall, the Emporia Pro EV charger is a plug-and-play setup that can easily boost the charging speeds of your existing power panel. Charger installation is a breeze if you have an outlet for the NEMA plug, but the home monitor system is much more complex, depending on your wiring configuration.
Luckily, the Emporia team is easy to get in contact with and very helpful in assisting with any installation questions. Even without the VUE Monitoring system, I’d recommend the Emporia Pro to maximize your home charger speeds. Who doesn’t love faster charging?
Check out my complete installation journey in my video review below.
Buy the Emporia Pro Level 2 EV Charger
FTC: We use income earning auto affiliate links. More.


![Not enough: Corvette concept falls 1,000 hp short of Chinese hypercar hype [video]](https://i0.wp.com/electrek.co/wp-content/uploads/sites/3/2025/08/not-enough.jpg?resize=1200,628&quality=82&strip=all&ssl=1)


